Monday, February 15, 2010

Om Suryaya Namah!

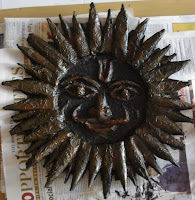
This time I’ve tried to recreate a very popular, traditional and metal-finish sun god. Though the actual ones done by embossing on a metal are far more attractive and authentic, this isn’t bad too! Neil Buchanan of Art Attack had demonstrated this kind of sun and moon crafts using newspapers. I’ve made use of a circular cake board for the base of the face and then stuck cardboard and later made cones out of newspapers for the sun’s rays. To make the surface slightly hard, I’ve made use of Neil’s technique, his paper-mache comprising of pieces of tissue paper stuck down with a mixture of PVA glue (fevicol) and equal parts of water. The final painting with metal finish acrylic colors is what made my Suryabhagwan “metallic” and varnish added to his “tejas” (luster, brilliance..)! :)

Step-by-step images...

Monday, January 18, 2010

Antique frame

One of my Google searches for a frame design gave me this pattern with newspaper rolls. I have this habit of saving good pictures from the net as and when I see them. It was recently when I found this Ravi Varma painting card at Gangaram’s in M.G.Road, that I remembered the framing idea I’d long back saved.
The first step was to make an octagon base with cardboard. To make the base stronger, I’ve used an idea suggested by Neil Buchanan of Art Attack (I am a regular viewer and a big fan of this show. In fact, I never get tired of watching the same episodes over and over again! :) ). He has this technique of hardening any base with tissue paper and PVA glue + water mixture. Instead of PVA glue, I’ve used normal fevicol. And it really worked! The dried product had just the right thickness and strength that I needed. The plain surface now even had a texture to it. The only time consuming process in this was rolling newspapers and cutting them out to match the edges of the cardboard base underneath. Once all pieces of newspaper roll were stuck into position, painting both sides didn’t take much long. Since I had this Ravi Varma painting in mind, I’ve used a combination of metallic colors that go well with the painting. To make the picture stay in position, I’ve created U-shaped hook-like pieces with cardboard and stuck them behind in such a way that a long newspaper roll runs almost the entire length of the frame through the hooks, thus supporting the picture. And…like always, I’ve given the frame a final coat of varnish for that added glow!

Monday, January 11, 2010

Welcome home!

I’ve been making use of cereal boxes, corrugated packing sheets and other strong cardboards as the base for most of my projects. In fact, now I have so many empty boxes in my utility area that it almost looks like a trash can there! Thanks to my sister too for her contributions :) Anyways, now I was in search of something really strong enough to hold one of my upcoming projects. That is how our Saturday shopping landed me in a stationery shop in Jayanagar. There I found the cardboard I needed and was going to leave when something caught my attention - a bundle of 60 wooden lolly sticks(ice-cream sticks) that were not very expensive! At that moment I had no idea about what to make out of them, but anyways added it to my collection of raw materials.
Every time I took the stairs at our apartment, I would be impressed by the creativity and variety of door hangings available. I wanted to make one for our door too. It didn’t take me long enough to make use of these lolly sticks to create this basic sketch for our door hanging.
After carefully selecting completely straight lolly sticks, I made 7 diamond shapes with them and stuck them firmly onto newspaper. The benzene-like structure below was similarly created. Though initially I thought a single layer of newspaper was sufficient for the base, I had to add more corrugated sheets and newspapers to make the base stronger. Once the skeleton was complete, the only process remaining was painting. I wanted it to be bright and have a traditional feel to it. After sharing my thoughts with my husband we decided on this geometrical pattern and color combination for the top portion. The peacock feather pattern at the bottom portion was a sudden idea that I got while painting the diamonds. Though initially it didn’t go well with the geometry of the top portion, once I adjusted the colors and added more details to the feathers, it looked grand! A final coat of varnish added a glow to it. Glass pipes and beads were threaded together and stuck at every diamond to enhance the traditional feel. This project took longer than expected, but finally when we hung it outside yesterday (with a little difficulty for the structural support), I was happy. “Now, that’s a bright and warm welcome to our guests!” :)

Work in progress...


Tuesday, November 24, 2009

Framed peacock

This art work first began as embroidery. I wanted to somehow make use of the shiny anchor threads that I'd bought many months ago. I started with this peacock drawing that I remembered we had in our drawing book in school. Once the embroidery was done, which was slower than I'd imagined, I kept thinking of different ideas to showcase it. Finally, after 2-3 days, I was convinced that there was no better way other than creating a frame. I got a new raw material for the frame - m seal, yes, the same epoxy compound used for pipes. This was the first time I was working with m-seal. I saw the instructions on creating an m-seal frame in a magazine, got all the needed materials and started one morning. I was totally unaware that m-seal would leave behind black marks in your palm and had a tough time cleaning it, but later during the day found that if you rub talcum powder on your hands then the stickiness reduces and hands remain clean! Finally by around 6pm I’d completed making the frame. The unpainted black frame also looked good except for the portions where there was no m-seal. The next day I started painting it with fevicryl metallic paints to give the frame a country antique feel. After 3 hrs of carefully painting the frame, I was utterly thrilled with my latest creation. And then I felt, “hmmm… my frame deserves something better than this peacock”. :) Anyways I am completely happy to have learnt something new that I can now add to my collection.

Step-by-step images below:


Wednesday, October 28, 2009

Worli paintings


Our visit to an art and craft exhibition inspired me to make something out of Worli paintings. Back at home I started my research on Worli paintings and found quite a dozen images on the internet. Worli paintings are usually done on a brick red background with the characters and other elements in white. From the paintings I found on the net, I did a mix & match and chose some characters with 2 themes in mind – marriage and village life. Most of the paintings include a human-chain in either spirals, or curves or even a straight line. I've included them in each of my paintings in an "S-shape". This forms the major part of my painting. Unlike some other painting styles, I found Worli paintings to be comparatively easier to do and still contain a whole lot of meaning to it. My favorite among these two paintings is the one on their social lives; in addition to reflecting their simple lives, it also has a lot of women involved in various activities.

Sunday, October 11, 2009

Rabbit soft toys

It was my friend's daughter's 1st birthday. For the gift, my husband suggested why not I make something for her? That inspired me to research the net for interesting gifts for an one yr old. And then I found the instructions for making this rabbit. Since I'd made a few soft toys back in my high school days, the instructions were easier to understand. The very next day I started with the sample white rabbit, made from used clothes and cotton from the medical stores! And..it was so easy, it took only around 4 hrs to complete one! Then I moved on to other fabric materials, colors and combinations - grey and pink & yellow and baby pink. I wasn't very sure whether she would like it, but nevertheless was happy to present her with something done with my own hands. I wasn’t disappointed at the end! Her happy giggles and squeals were the best appreciation I'd received....
More...


Tuesday, September 15, 2009

Floral wreath with bird and nest

Unlike the completely floral wreaths, I’ve added a bird and nest to my wreath arrangement. The idea for this kind of wreath originated when I found a broken plastic lid at my sister’s place! Yes, that is the base used for this wreath arrangement. First of all I’ve covered the plastic base with green organti and green wires. The red and white roses were made out of organti and then arranged together with artificial leaves. I've used ordinary fabric for the bird. For the nest I’ve made use of a piece of plastic bottle wrapped in brown paper and randomly stuck small bits of corrugated sheets on it. 3 eggs made out of stockings material were included inside the nest. Since I'd obtained the idea and the base material from my sister's place, I finally gifted the completed wreath to my sister. There, a broken lid transformed into a beautiful piece of wall-hanging, my little creation now proudly hangs in their home. :)

More pictures below.